ผลต่างระหว่างรุ่นของ "01219245/trello setup"
Jittat (คุย | มีส่วนร่วม) |
Jittat (คุย | มีส่วนร่วม) |
||
| (ไม่แสดง 3 รุ่นระหว่างกลางโดยผู้ใช้คนเดียวกัน) | |||
| แถว 3: | แถว 3: | ||
We shall put all project information in your [https://trello.com Trello board]. All information will be put on the board as cards. But we will not put these card in the work flow (To Do, Doing, Done). We will create a separate list, called '''Course''', for this. (To create a list, click "Add a list...".) This list should be the right most one, so that it does not interfere with basic workflow. | We shall put all project information in your [https://trello.com Trello board]. All information will be put on the board as cards. But we will not put these card in the work flow (To Do, Doing, Done). We will create a separate list, called '''Course''', for this. (To create a list, click "Add a list...".) This list should be the right most one, so that it does not interfere with basic workflow. | ||
| − | Our first card for this list should describe your project. The card title should be your project's name. In the description, you should put your student ID | + | Our first card for this list should describe your project. The card title should be your project's name. |
| + | |||
| + | In the description, you should put: | ||
| + | * your student ID | ||
| + | * your name, and | ||
| + | * the URL to your Git repository main web page. Note that this is not the link you need to check out, but the URL of the main page for your repository. (See [[01219245/repository_setup|how to create remote repository]]) | ||
| + | |||
| + | You should briefly describe your project in that card as well. You should add a representative picture for your project. At this point, you can just put the picture of the paper prototype. | ||
[[Image:Gozilla-trello-card.png]] | [[Image:Gozilla-trello-card.png]] | ||
| − | After you add the card, it should look like this | + | After you add the card, it should look like this. |
[[Image:Trello-course-stack.png]] | [[Image:Trello-course-stack.png]] | ||
| + | |||
| + | You can take a look at a sample board at [https://trello.com/b/HMZpZ1HL/gozilla-run https://trello.com/b/HMZpZ1HL/gozilla-run]. | ||
รุ่นแก้ไขปัจจุบันเมื่อ 16:49, 4 มีนาคม 2557
- This is part of 01219245.
We shall put all project information in your Trello board. All information will be put on the board as cards. But we will not put these card in the work flow (To Do, Doing, Done). We will create a separate list, called Course, for this. (To create a list, click "Add a list...".) This list should be the right most one, so that it does not interfere with basic workflow.
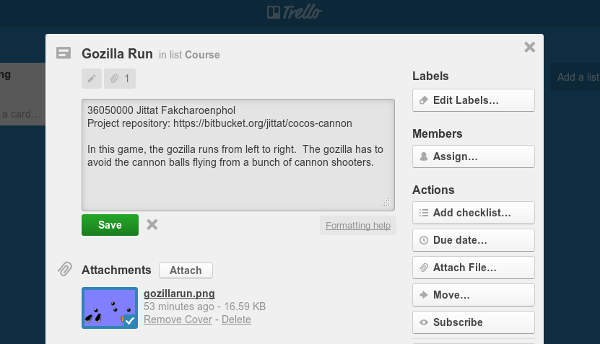
Our first card for this list should describe your project. The card title should be your project's name.
In the description, you should put:
- your student ID
- your name, and
- the URL to your Git repository main web page. Note that this is not the link you need to check out, but the URL of the main page for your repository. (See how to create remote repository)
You should briefly describe your project in that card as well. You should add a representative picture for your project. At this point, you can just put the picture of the paper prototype.
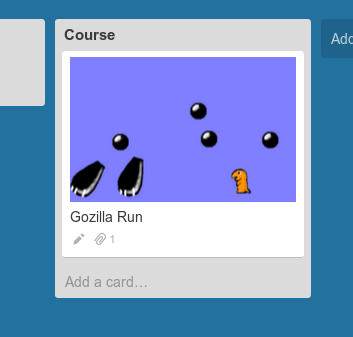
After you add the card, it should look like this.
You can take a look at a sample board at https://trello.com/b/HMZpZ1HL/gozilla-run.

