ผลต่างระหว่างรุ่นของ "Prg2/flappy dot"
Jittat (คุย | มีส่วนร่วม) |
Jittat (คุย | มีส่วนร่วม) |
||
| แถว 217: | แถว 217: | ||
=== Git branches === | === Git branches === | ||
| + | |||
| + | When working in a team, try to start your own work in a separate development branch (recall the fun-with-branch activity). You should merge your work to main branch when it is done. | ||
| + | |||
| + | However, when working on features with many dependencies, it would be useful to talk with your teammate to get your (non-breaking) codes to be pulled to the main branch a little more often. | ||
== Keyboard control == | == Keyboard control == | ||
== Pillar movement == | == Pillar movement == | ||
รุ่นแก้ไขเมื่อ 19:18, 10 มีนาคม 2564
- This is part of Programming 2 2563
เนื้อหา
Overview
You will work with another student (or more). You would work alone shortly in the beginning to get some feature done, then we would like to ask you to form a team of 2 or 3 students to complete the game, while collaborating with git (and github).
Task breakdown
Before we start, it is useful to think about incremental steps you needed to complete the game. You can think of this as a list of features (probably built on top of one another).
When you get your list, please see the steps that we plan to take here.
- The player can jump and fall. (Implement player physics)
- The player jumps with keyboard control
- Show a single pillar pair.
- Move the pillar pair across the screen.
- Let the pillar pair reappear.
- Check for player-pillar collision.
- Make the game with one pillar pair.
- Show more than one pillar pairs.
Getting started
We have provided the starter template for you at https://github.com/jittat/flappydot-starter-template. Go to the repository and then click "Use this template" to create a new repository.
To start working, you should clone the project to your local machine. The starting code only shows a single dot on the screen. The template also provides two other images for the pillars (one for the top part and the other for the bottom part) in images folder. You should try to run the code to see if everything works fine.
Project board
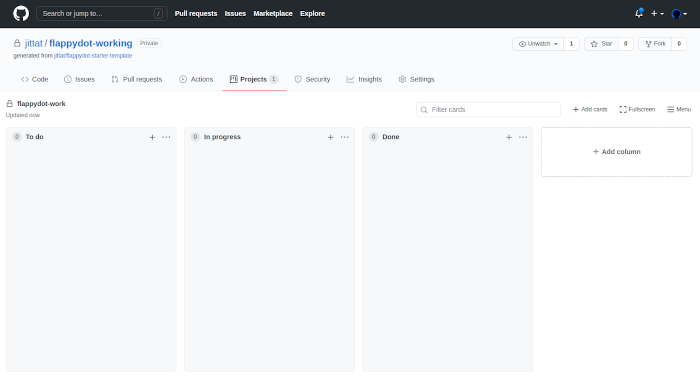
Create the project board for your repository. Use the 3-column format: To do, In progresss, Done. You can also use the Basic Kanban template when create the project.
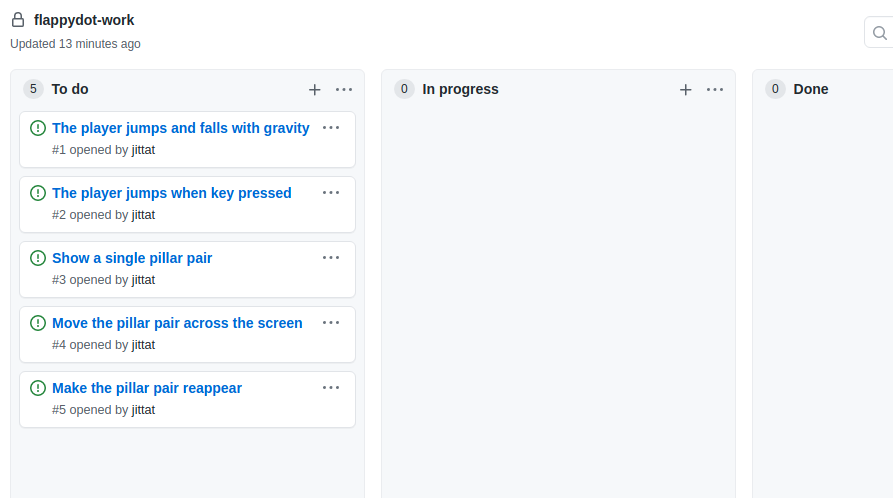
Use this project board to plan your project. Add a few steps from the list above as notes, then convert them to Github issues so that you can associate your commits with them. Don't forget the order the cards by their priority, i.e., the issues that you want to work on the most should be at the top.
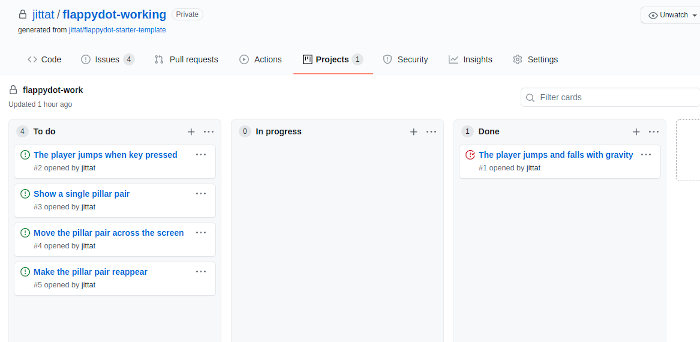
When you are ready, just move the first card (the player jump with gravity) to the "In progress" column.
Basic player physics
This is the part where you would work as a single developer.
Review of physics
You might forget all these, but if you want objects in your game to look and act a bit like real objects, you might have to recall stuffs you learned from mechanics.
Let's look at the basics. An object has a position, its position changes if it has non-zero velocity.
How can you change the player's position? We can set its x and y attribute on the sprite.
If you want to apply the velocity, you can change the player position based on the velocity.
If there is an acceleration, the object's velocity also changes. The Dot currently does not have velocity as its attribute, so we will add it. Now, you can update the velocity based on the acceleration.
These attributes (the position, the velocity, and the acceleration) all have directions. Sometimes, you see negative velocity; this means the object is moving in an opposite direction as the positive direction. We shall follow the standard co-ordinate system for tkinter, i.e., for the y-axis, we think of the direction as going downwards, i.e., the y-coordinate increases as you go down.
While in Physics, everything is continuous, but when writing games, we don't really need exact physics, so we can move objects in discrete steps.
So the usual pseudo code for physics is as follows.
pos = pos + velocity;
velocity = velocity + acceleration
Falling dot
To simulate the player falls, we should maintain the player's current velocity, so that we can make it falls as close as the real object.
Let's add this line that initialize property vy in Dot's initialization code:
class Dot(Sprite):
    def init_element(self):
        self.vy = -30
Notes: recall that we have changed the initialization method for sprites to init_element (previously we called it init_sprite).
You may wonder why we put -30 here. First, it should be negative because we want to move up. But why -30? It is just pure guess at this point. However, when you write games, you might want to try various possible values and pick the best one (i.e., the one that make the game fun). You can adjust both the starting velocity and the GRAVITY constant (currently 2.5).
The update method changes the player's position
class Dot(Sprite):
    # ....

    def update(self):
        self.y += self.vy
        self.vy += GRAVITY
Note that we update self.vy at the end of update. Try to run the program. You should see the player falling.
We are using -30 as a magic number. Let's try to get rid of the magic numbers first, by defining them explicitly. Add STARTING_VELOCITY constant after GRAVITY, and change init_element to use the constant instead of using -30.
GRAVITY = 2.5                    # this line is already in the file
STARTING_VELOCITY = -30

class Dot(Sprite):
    def init_element(self):
        self.vy = STARTING_VELOCITY

    # ...
Test your code again. If everything looks fine, you should commit your code by calling:
git commit -a
and enter the commit message. You can also commit inside VS Code. In the commit message, don't forget to refer to issue #1 in your project board. To tell github that you have resolved the issue, include the message "Resolve #1" in the commit message.
Then you should push your work back to github:
git push
After that don't forget to move the card to the Done column.
Teamwork
You will work with other students. Form a team of 2 students (preferably). A team of 3 students is also OK.
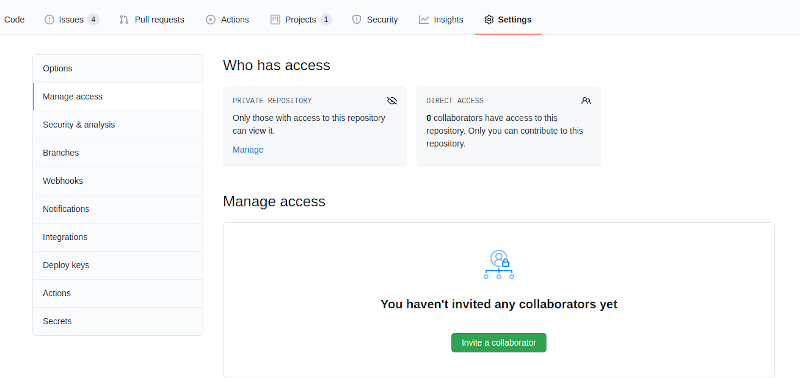
Choose one student as the owner of the repository and add the other members as collaborator. Then invite the other student as collaborator.
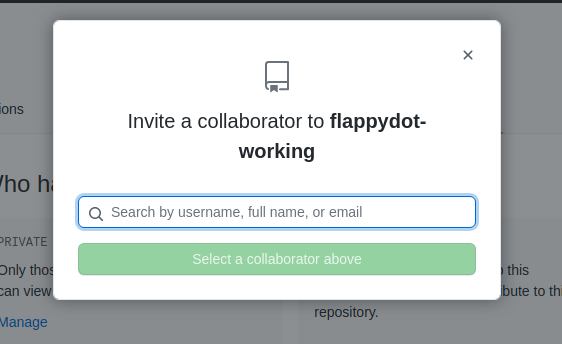
First go to "Settings" (top menu) and "Manage access" (side menu). Then click "Invite a collaborator".
Choose the username.
The status shows that github is waiting for the user's response.
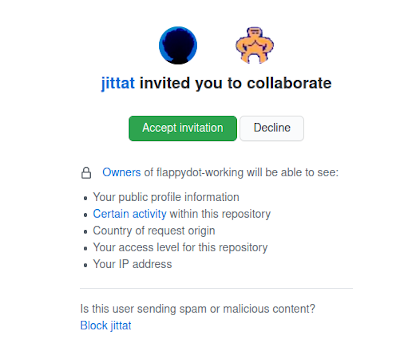
The invited user will get an email. Clicking on that would lead to a confirmation.
After the user has confirmed, you will the updated status as below.
Quick review of git commands
- In this assignment, we assume that you have some experience using very basic git commands. If you have trouble navigating git, please call the instructor or the TA on discord.
- Git cheatsheets:
- git-cheat-sheet-education.pdf by github
- cheatsheet by Atlassian
Here are a few commands that we might use.
- Working with remote repository
- git pull
- git push
- git fetch
- Working with branches
- git branch --- lists local branches (git branch -a lists all local and remote branches)
- git branch BRANCHNAME --- create a new branch
- git checkout BRANCHNAME --- switch branch
- Merge
- git merge SRC --- merge from SRC to the current branch
How to split work for Flappy Dot
When working in a team, you need enough work to ensure everyone has something to do. Each member should work on a different task. These tasks should be somewhat independent, i.e., each member can work fairly independently without having to consult everyone in the team.
Many features of Flappy Dot can be implemented independently so when you work with your friends you can split the work. The following tables give a few possibilities.
For 2-member team:
| Member 1 | Member 2 |
|
|
|
|
For 3-member team:
| Member 1 | Member 2 | Member 3 |
|
|
|
|
|
|
Since this is a small game, it would be hard to split the work in later steps. In that case, you can split the repository to work individually, or you can do pair programming to get the game done.
Git branches
When working in a team, try to start your own work in a separate development branch (recall the fun-with-branch activity). You should merge your work to main branch when it is done.
However, when working on features with many dependencies, it would be useful to talk with your teammate to get your (non-breaking) codes to be pulled to the main branch a little more often.

